

Installing a solar panel system can be a challenging undertaking, especially if you go the DIY route. Even if the prospect of DIY solar interests you, there’s a lot of preparation involved and you may be wondering how to get started.
To make the process as smooth as possible, we created a comprehensive guide on how to install solar panels step by step. Read on to learn everything you need to know as you equip your home to produce its own renewable energy.
The Planning Phase

It should go without saying that the better you prepare for solar panel installation, the easier the installation process will be. Let’s unpack the five steps of the planning phase.
1. Evaluate Your Home’s Readiness
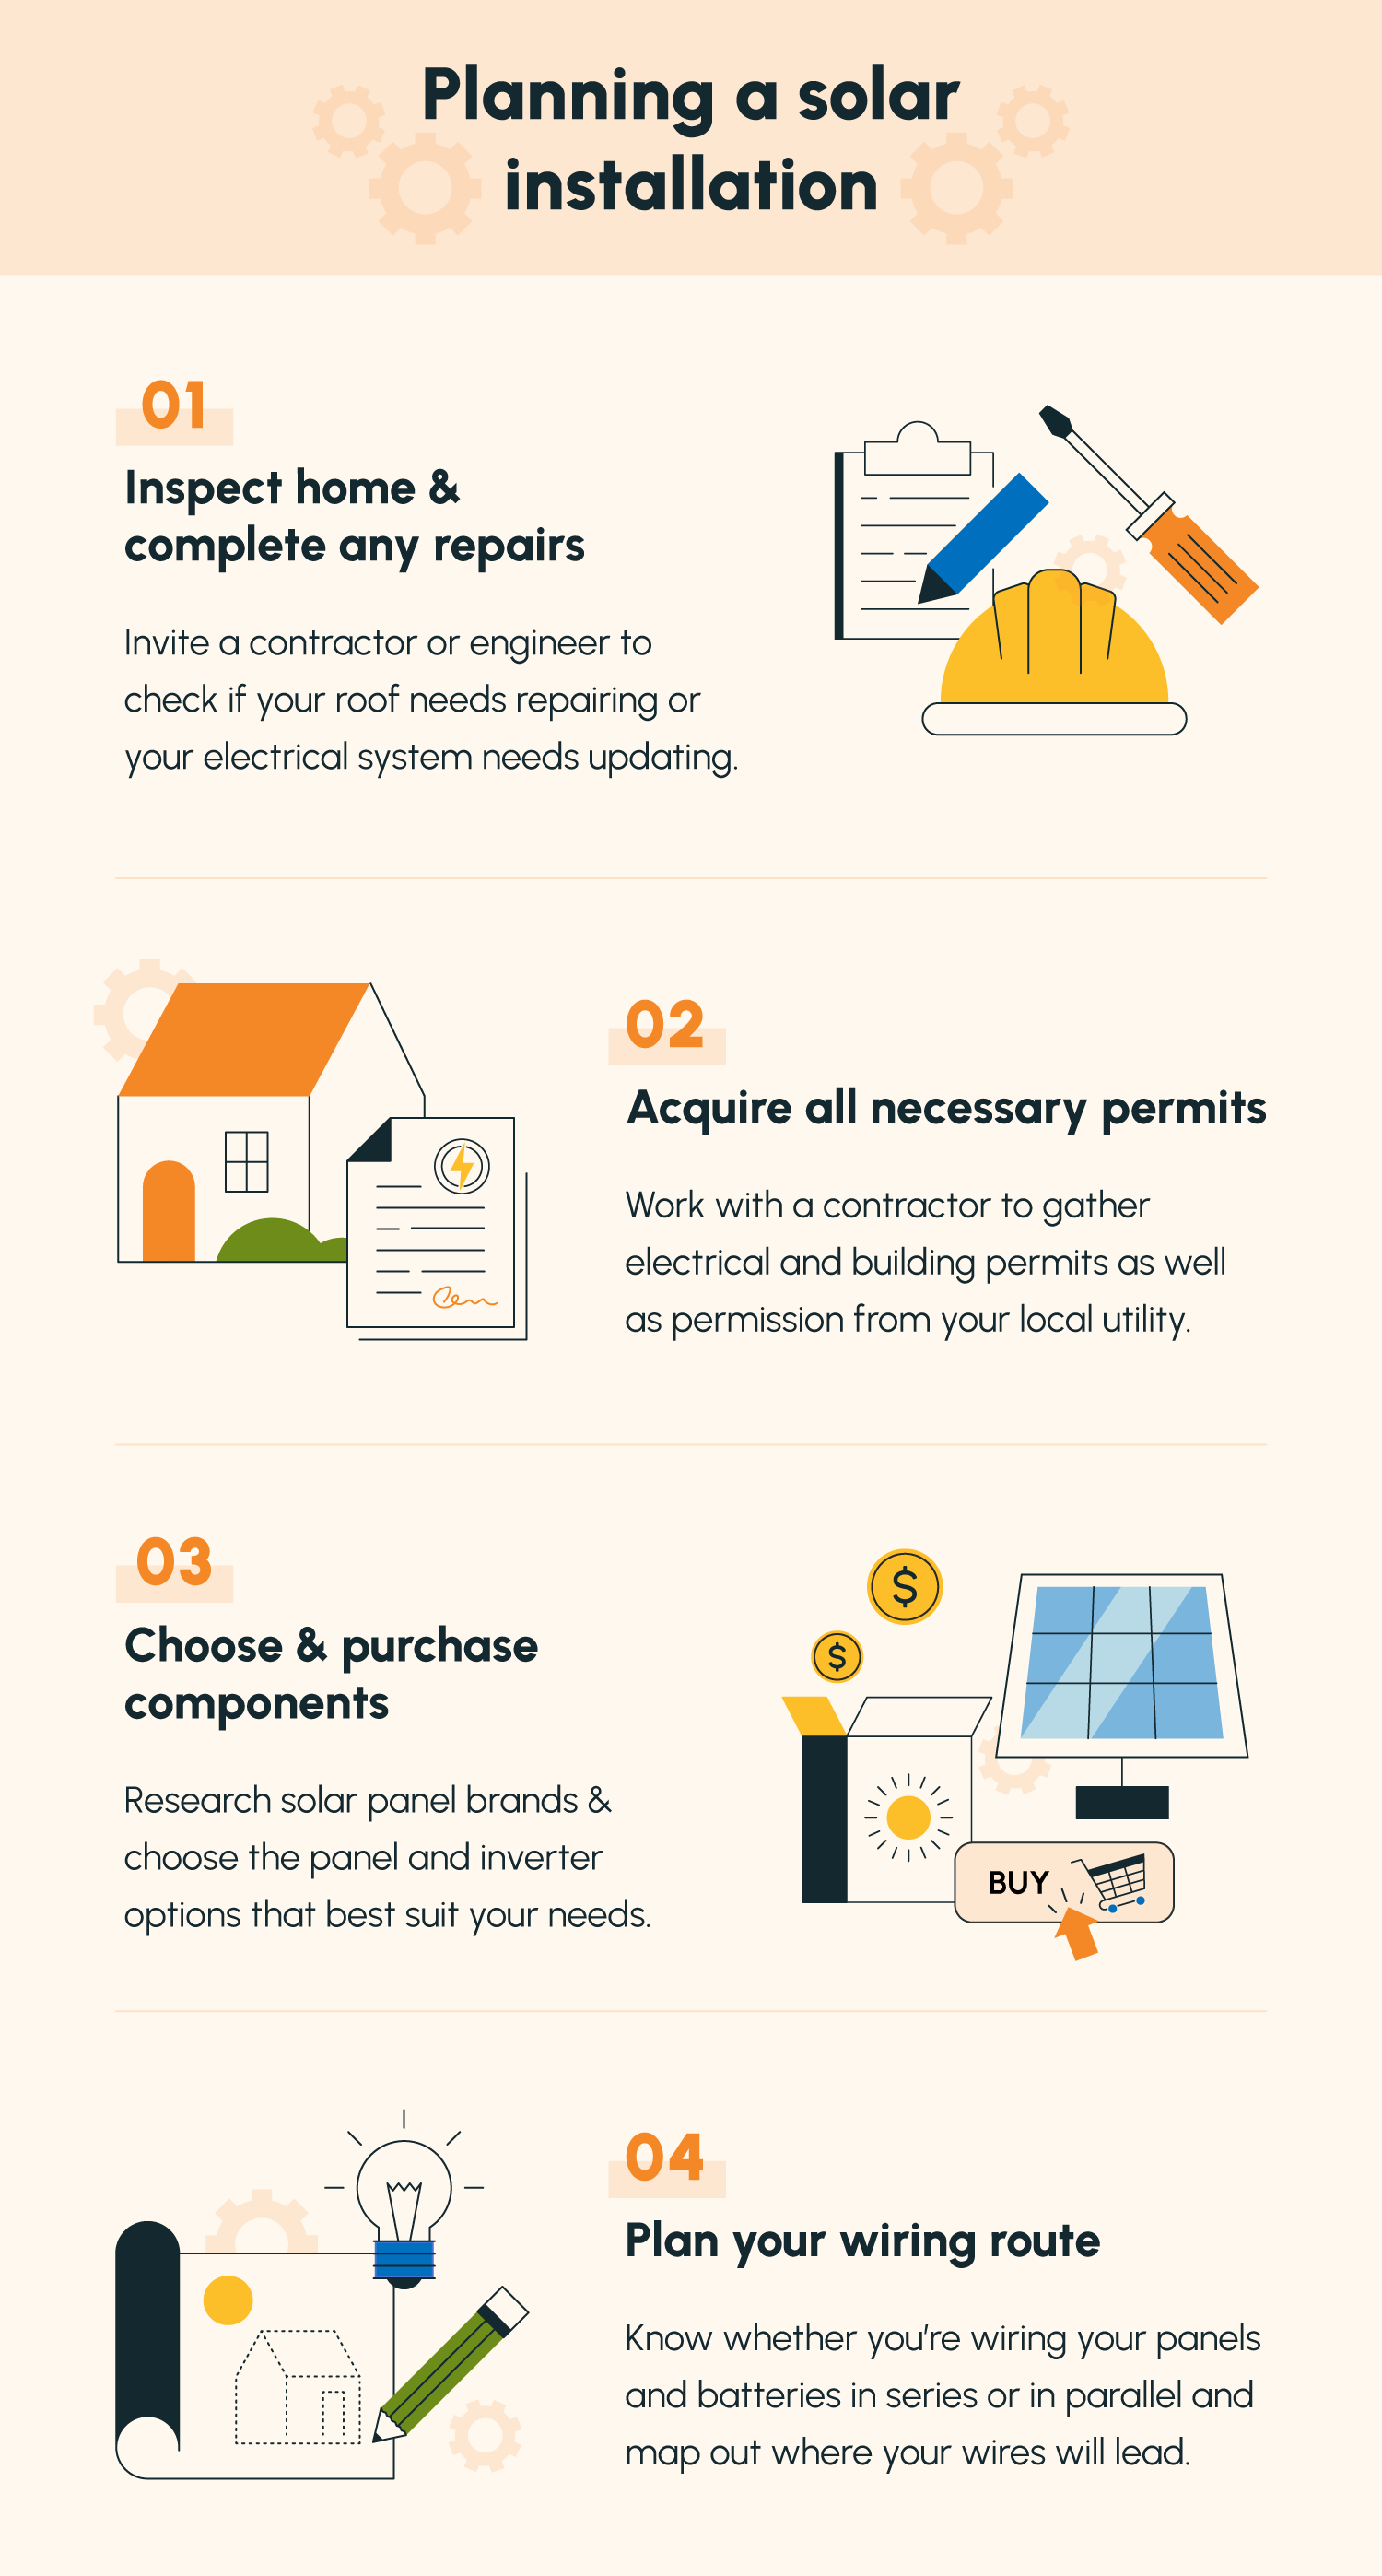
Not every house is solar-ready — some older homes have outdated electrical systems, roofs in need of repair, and other issues that you should address before installation begins.
To avoid setbacks down the line, invite a licensed contractor or engineer to your home for a site evaluation. Contractor licensing requirements vary by state, so look up your state’s requirements and confirm that any professional you contact is qualified to evaluate your home.
There’s a chance that they’ll advise you to update your electrical system or conduct home repairs before moving forward with installation.
A contractor can also help you determine what part of the roof to place your panels, and whether you’ll need a certain type of mount to get them to stay put.
2. Secure All Necessary Permits
Once you confirm that your property is a good fit for solar panels, there’s some paperwork to knock out before you start buying components. The last thing you want is to run into legal trouble for installing a solar panel system without first acquiring the right permits.
Permitting can be a pretty intense process — in order to meet safety and zoning requirements, you’ll need:
- Local electrical and building permits.
- A solar installation and grid connection agreement with your local utility.
- Applications for federal and local incentives to offset the cost of solar.
Luckily, you don’t have to do this process without help. Solar installers and contractors have extensive experience helping customers acquire permits and can file for everything on your behalf.
Since permitting can take a while, it’s a good idea to regularly check in with whoever’s helping you with permitting to confirm that progress is being made.
3. Determine and Purchase Your Components
Depending on whether you’re installing a residential or off-grid solar system, your components will look a bit different. Every system should have the following major components:
- Solar panels
- Inverter(s)
- Mounting equipment
- Battery and charge controller (optional)
- Wiring
Your choice of solar panel and inverter will depend on your goals for your system and your property’s features. For example, some solar panels are better equipped to handle high temperatures than others, while some boast durability standards that can withstand even the most intense weather conditions.
Likewise, your choice of inverter will depend on a few factors, including shading in your area, your budget, and whether you will install any batteries. While string inverters are the least expensive option, microinverters will keep partially shaded systems operating efficiently, while hybrid inverters are best for battery compatibility.
After choosing your panels and inverter(s), consult with your contractor to determine what kind of fuses, conduits, and other smaller components to purchase.
For RV and camper van solar setups, you may also need to invest in the following components:
- Fuse box
- Breaker
- DP switch
- Charger (or inverter/charger combo)
- Battery isolator
- Battery monitor
- Shunt
- Busbar
- Shore power plug
- 12v switches and outlets
4. Make a Wiring Plan
While it’s possible to wire as you go, this can result in a lot of backtracking, tangled wires, and frustration. Create a wiring plan in advance to make things easier on yourself when you get into the weeds of system setup.
Wiring Panels and Batteries Together
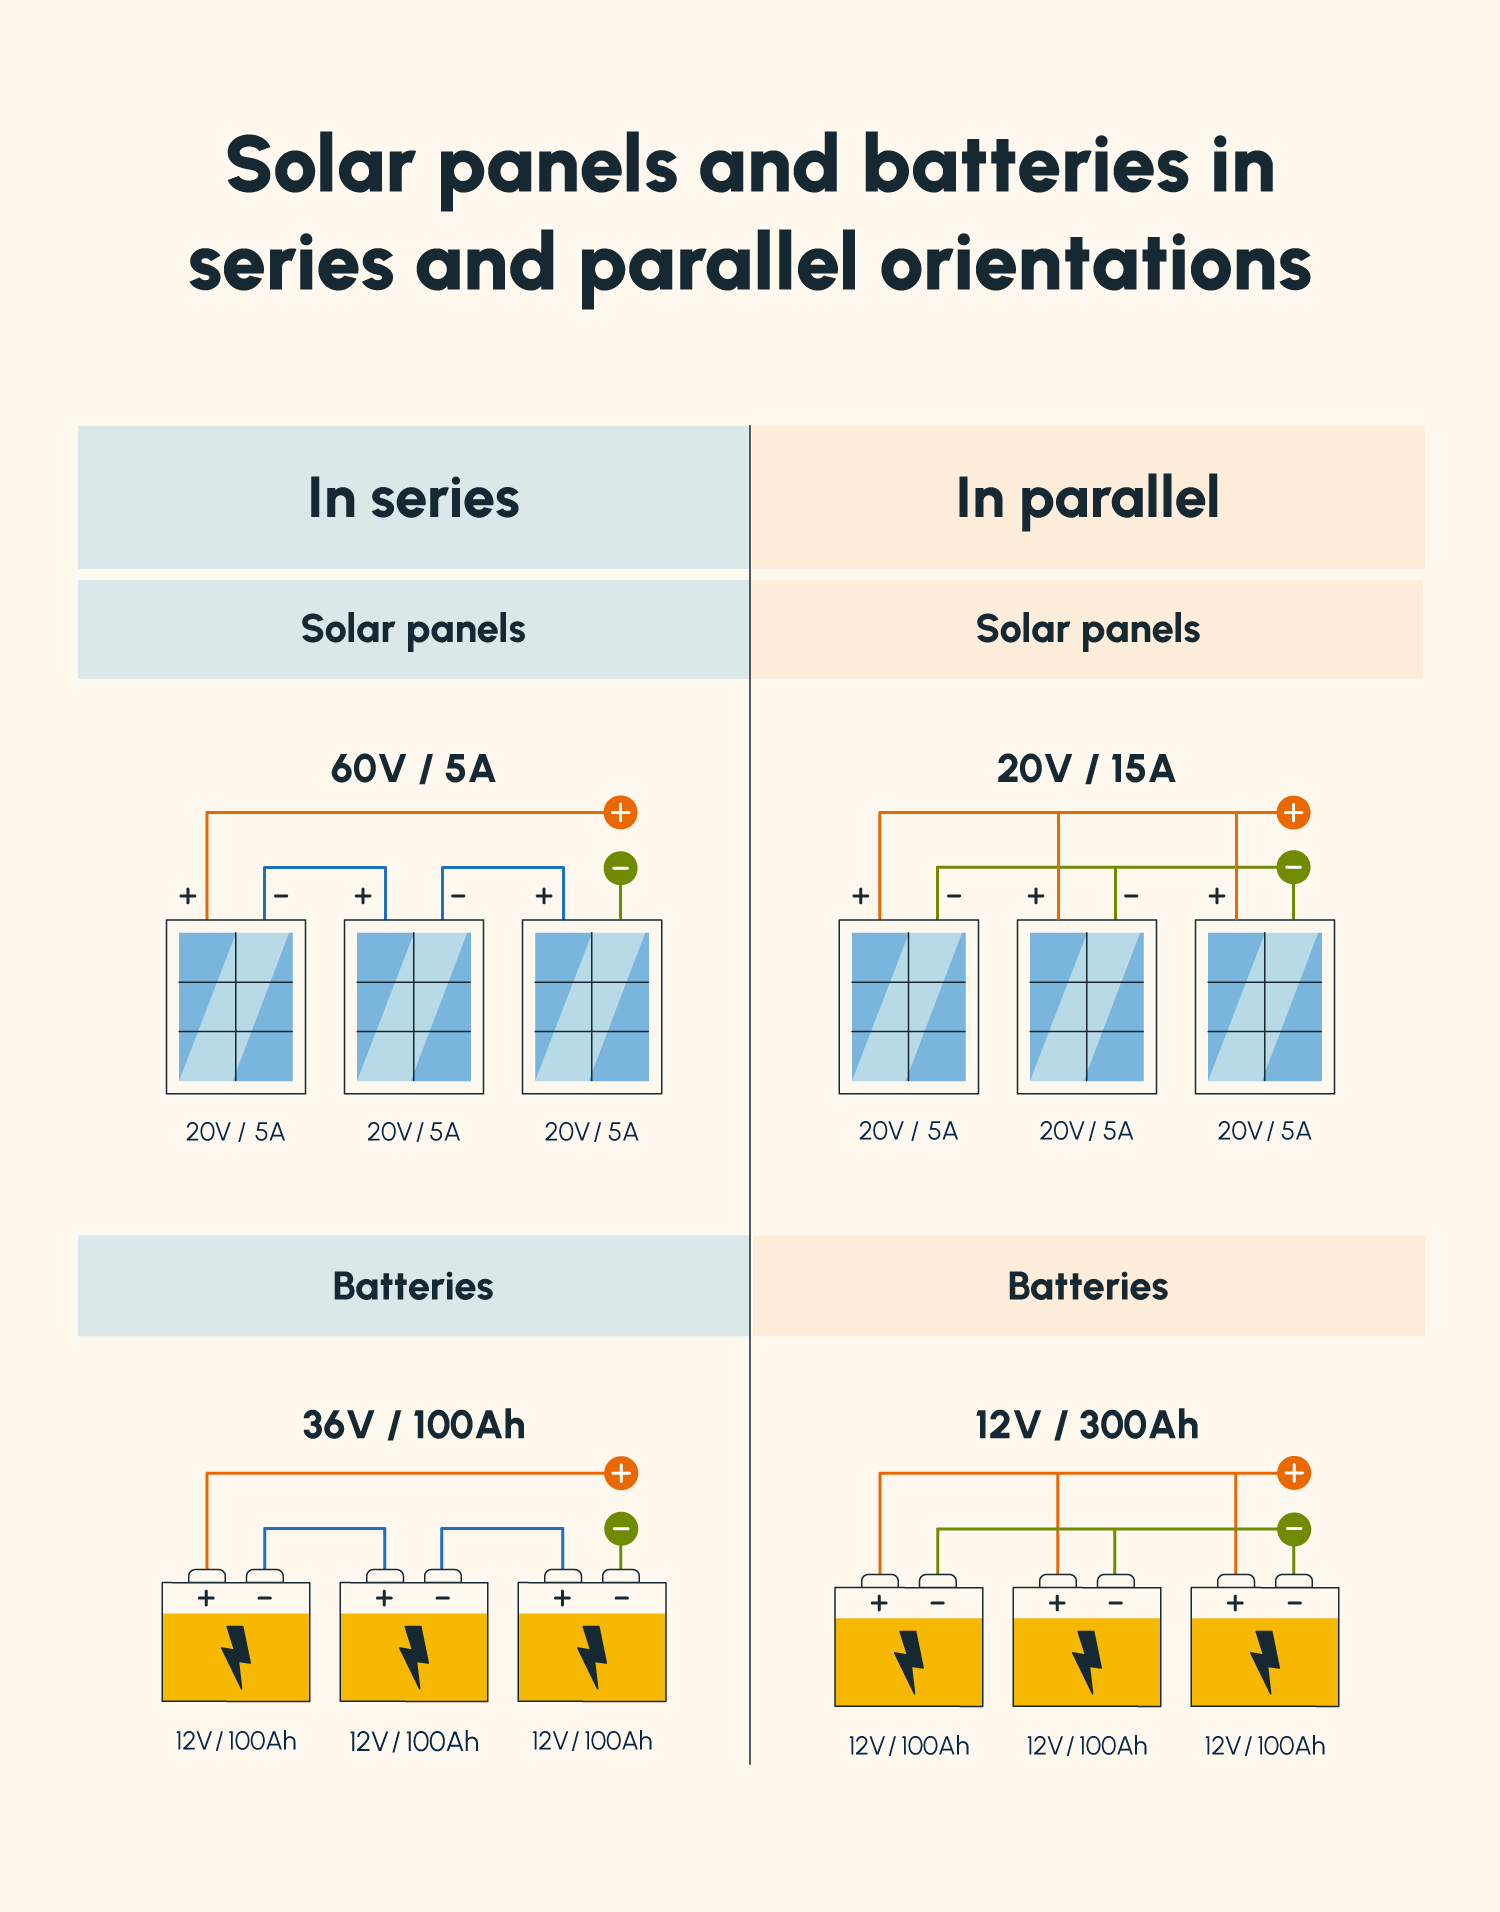
You can wire solar panels together in one of two orientations: series or parallel. We describe how to wire solar panels using both of these orientations below.
Wiring in series involves connecting the plus of one solar panel or battery to the minus of another (+-). This combines the two panels’ voltages without changing their current (amps).
While this allows you to use cheaper, smaller gauge wires, the setup is best equipped for unshaded areas, as one panel’s impeded performance in a series can equally impact the performance of all the other panels.
Wiring in parallel involves connecting two panels’ or batteries’ pluses or minuses together (++ or --). This combines the two panels’ current (amps) without changing their voltages.
With this wiring method, each panel can perform at its own maximum capacity without relying on other panels’ performance. However, it requires you to invest in larger, more expensive wires that can be challenging to manage.
Component Wiring Path
Your wiring path from your panels will vary depending on whether you’re installing a residential (grid-tied) or an off-grid system, and whether you’re using a central inverter or microinverters.
Residential (grid-tied) central inverter wiring path:
- Solar panel strings to junction box
- Junction box to inverter(s)
- Inverter’s AC Out to main panel
When using microinverters as opposed to a central inverter, each panel connects to its own microinverter before being routed to a junction box and the main panel.
Off-Grid Wiring Path:
- Solar panel strings to PV combiner box
- Combiner box to charge controller(s)
- Charge controller(s) to batteries
- Batteries (and generator) to inverter
- Inverter to electrical panel
5. Take Safety Precautions
DIY solar panel installation can be dangerous if you don’t take proper safety precautions. To keep cuts, bruises, and broken bones at an absolute minimum, be mindful of the following safety tips.
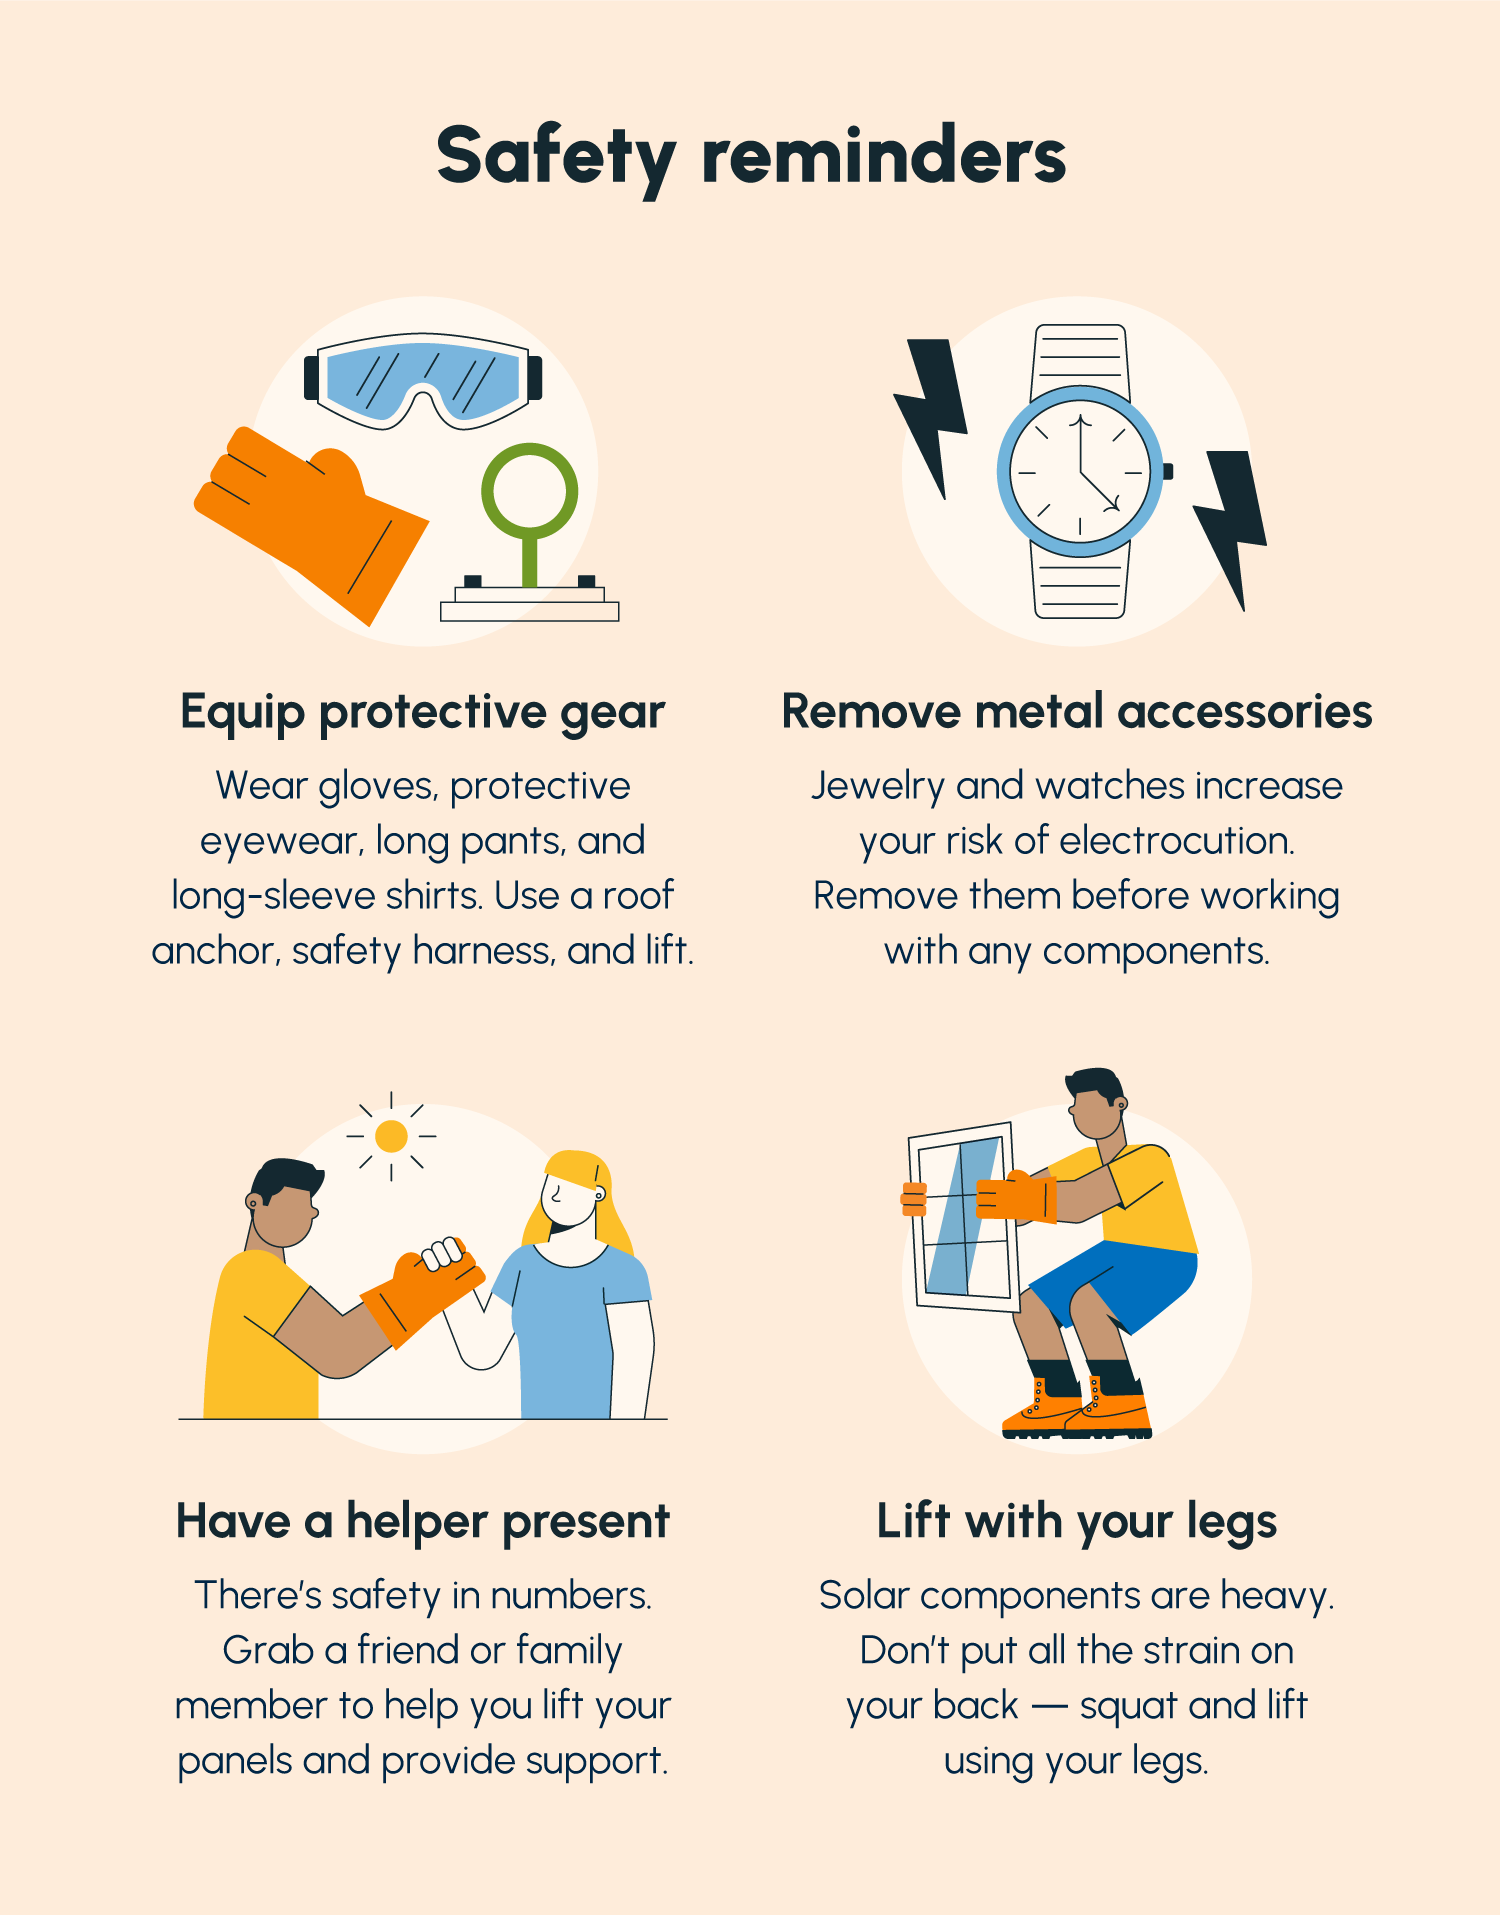
Protective Gear
The first step to staying safe when completing a solar system installation is to dress for the job. Always wear:
- Closed-toed shoes with grip
- Durable, long pants
- Long-sleeve shirts
- Gloves
- Protective eyewear
- Sunscreen
- Roof anchor and safety harness (for rooftop installations)
Of course, what you don’t wear is equally important to what you do wear. To avoid electrocution, you should remove all metal accessories like jewelry and watches.
Mounting Precautions
Both rooftop and ground mounting come with their own risks to account for.
When installing rooftop panels — in addition to using a roof anchor and safety harness to keep yourself safe from fall damage — you’ll want to avoid installation work when weather conditions aren’t ideal.
When ground mounting, be sure to contact local authorities before beginning any excavation, as you may run into gas or electric lines otherwise. When you start pouring concrete, avoid touching it to prevent burns. It’s also a good idea to mask up when mixing concrete to avoid inhaling toxic chemicals.
Heavy Lifting Precautions
Solar panels aren’t lightweight pieces of tech — they weigh upwards of 40 pounds each. As such, lifting them and stabilizing them on a roof or on ground mounts can be tricky. Be sure to take the following precautions when lifting heavy solar machinery:
- Have a plan — know what you’re lifting and exactly where you’re lifting it before you begin.
- Squat and lift using your legs rather than putting pressure on your back.
- Have another person present to support you.
- Use equipment like a hoist to help you transport objects you aren’t confident in lifting.
The Installation Phase
Once you’ve made your plan, you should feel ready to confidently move forward with installation.
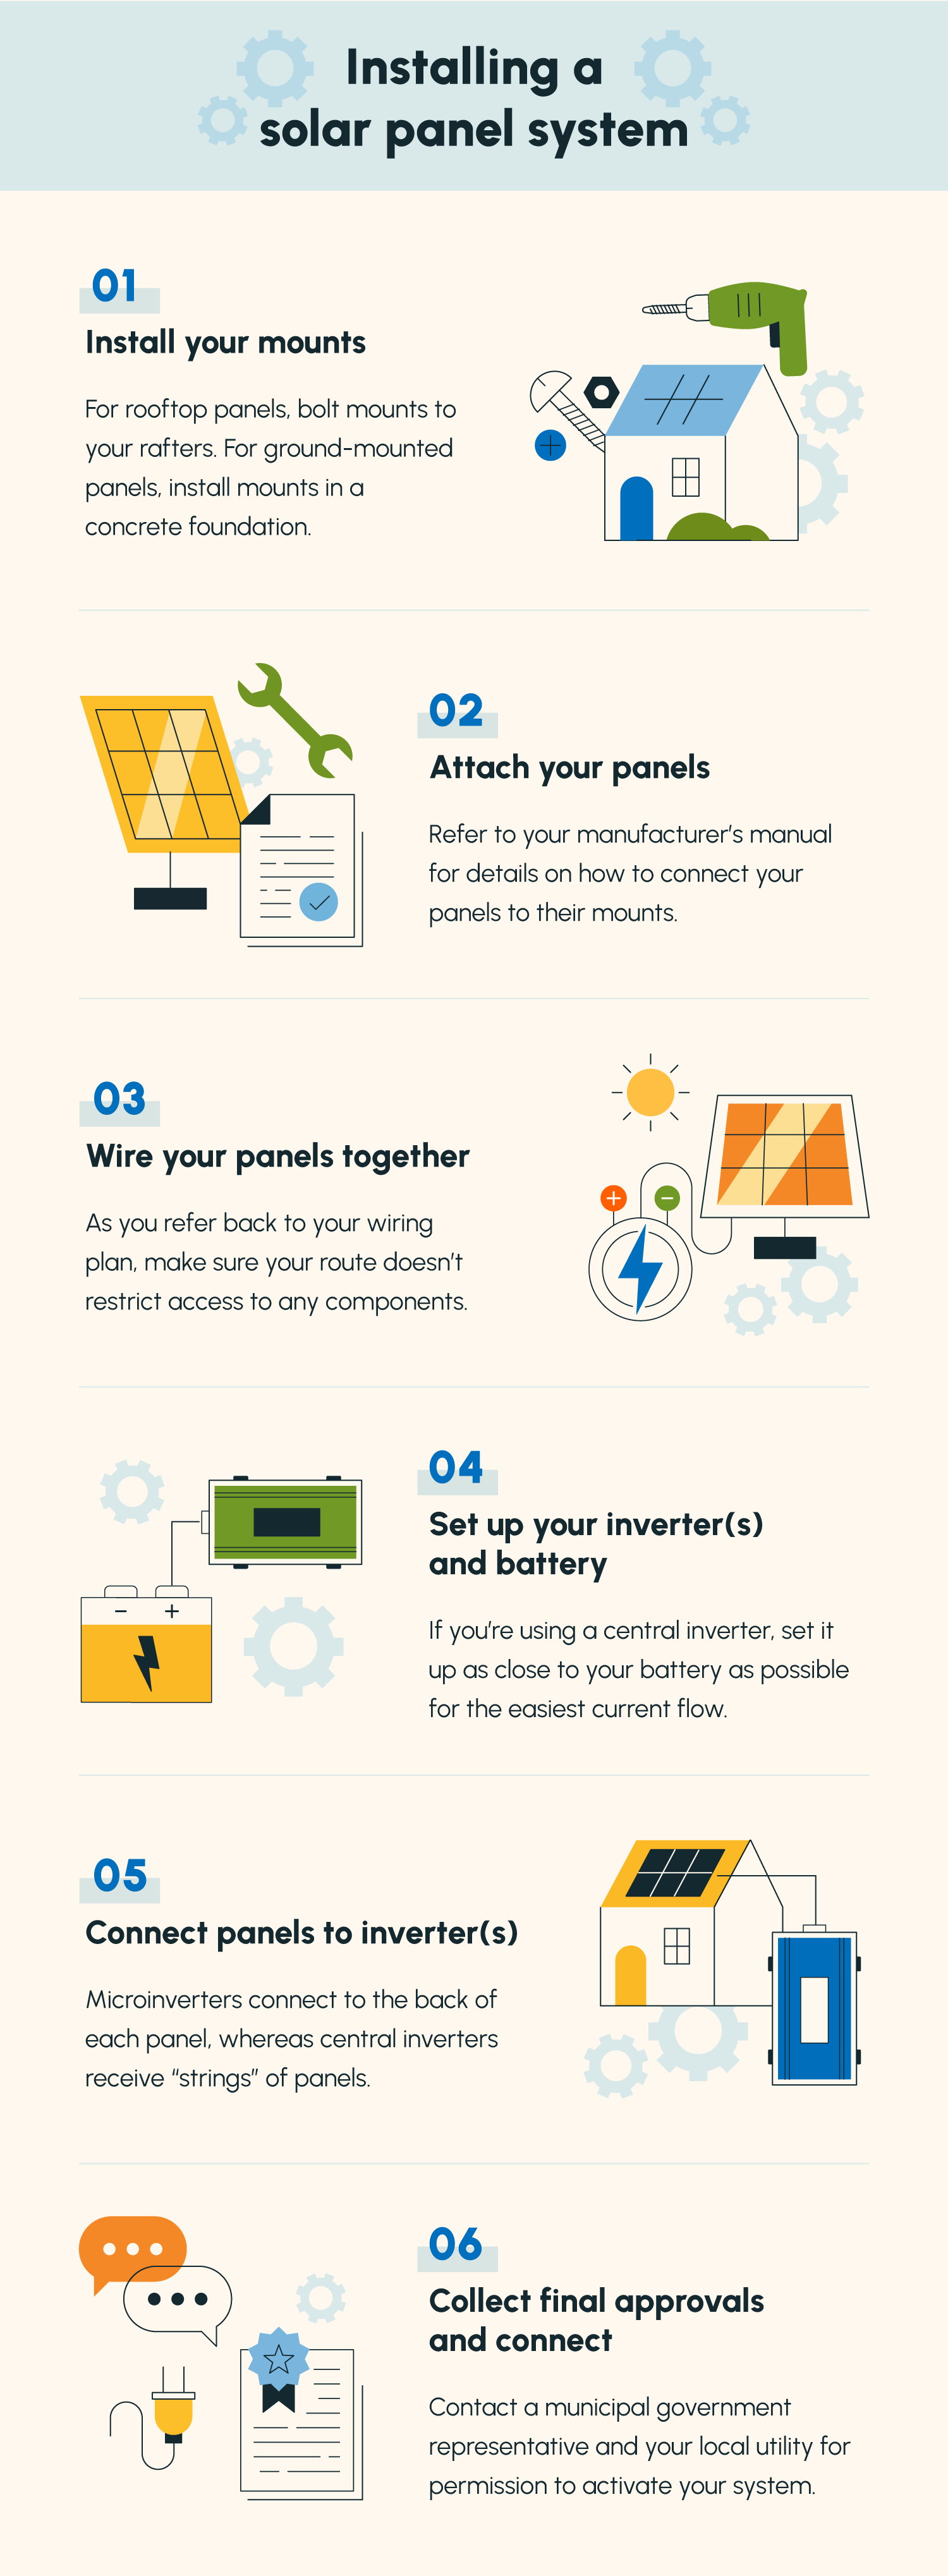
6. Start With Mount Installation
Without mounts, your solar panels wouldn’t be optimally positioned to collect sunlight, or worse — they’d slide right off your roof.
For obvious reasons, mount installation will look very different for every type of solar setup — rooftop, ground-mounted, RV, and any other format you can think of.
Roof Attachment Spacing
After identifying and marking the location of your rafters, you can start installing the flashings that will secure the mounting rails. Measure the distance between each mounting hole on your solar panels to determine how far apart to install each flashing and mounting rail.
Roof Type Considerations
Your roof type will determine how you will install mounting equipment. Here are a few options for various roof types:
- Shingle roof: You’ll want to install your flashings underneath the shingles, first loosening the shingles and removing any nails that may get in your way.
- Metal roof: You’ll use roof clamps for metal roofs, but your installation strategy will depend on your clamp’s manufacturer.
- Tile roofs: Tile hooks and tile replacements are both great flashing options that will hold rails in place.
- Flat roofs: If your roof is flat enough, you may get away with using a ballasted mount that doesn’t require you to make any holes in your roof — they’ll stay put, solely thanks to their weight.
Installing Racking Rails
When connecting your racking rails to your flashings, be sure everything is leveled and spaced out correctly. Your rails should align with the spacing of both your flashings and your solar panel mounting holes. When in doubt, refer to your racking report.
Regardless of where you install your panels, you want to make sure the mount is sturdy before attaching the panels themselves. Make sure to fully bolt roof mounts to your rafters and plant ground mounts firmly in the ground.
Since ground mount installation requires you to use more heavy-duty materials like concrete to build a foundation, it’s a good idea to recruit help from a contractor to be sure that installation is completed properly.
7. Mount Your Panels
Once mounts are stable, it’s time to set up your panels. Lifting panels onto both rooftop and ground mounts can pose a challenge without the right equipment or knowledge of the mounting process.
After installing your mounting attachments, whether on your roof rafters or in your foundation, you’re ready to lift the panels onto your roof. If completing a fully DIY installation, it’s a good idea to rent some equipment to get the panels onto the roof, since they weigh 40-45 pounds each on average.
If you don’t have anyone to help you lift the panels, it’s a good idea to invest in a lift rental — there are several types of lifts that can help you get the job done, including ladder lifts, scissor lifts, and boom lifts. If you do have help, you may just need a sturdy ladder and some scaffolding.
Once you have the panels lifted to the mounts’ level, it’s time to attach the panels. Every racking system is different, so make sure you read your racking system’s instructions to know how to align and connect your panels.
8. Wire Your Panels
Once you situate your panels, it’s time to start wiring them together. By now, you should have a wiring plan and just need to connect everything.
As you execute your wiring plan, there’s a lot to keep in mind:
- Access to system components: Be mindful of how your wiring path could restrict access from the solar array to the rest of the system.
- Safety: Exposed wires are a fire hazard — if installing rooftop panels, make sure that no exposed wiring makes contact with the roof itself.
- Aesthetics: Nobody wants a bunch of tangled wiring all over their roof and walls. When wiring together your system, try to keep your wires organized and grouped together.
9. Install and Bond Your Inverter(s) and Battery
Your inverter installation method will vary depending on what type of inverter(s) you’re using. Microinverters need to be installed on each individual panel, whereas central inverters (like string and hybrid inverters) are usually installed on the side of the house.
If you’re adding energy storage to your system, install your battery close to the inverter so that you can quickly convert the battery’s direct current (DC) into usable alternating current (AC) to power your appliances. Here are a few rules of thumb for battery wiring:
For connecting the battery bank:
- All cables should be the same size and length.
- Keep cable connections secure but not too tight.
For wires between the battery bank and the inverter:
- The battery bank and inverter should be as close together as possible.
- Positive and negative cables should be the same length.
- Direct cables so that they don’t interfere with battery enclosure ventilation.
Safety Guidelines For Batteries
Battery installation comes with its own set of safety precautions. As you set up your energy storage system, keep the following in mind:
- Avoid short-circuiting: Wire your battery carefully, making sure that its positive and negative terminals never connect.
- Wear appropriate gear: Keep protective gloves on and any metal accessories or jewelry off.
- Prevent wire damage: To the best of your ability, keep wires away from any sharp edges that could damage them.
10. Connect Panels to Inverter(s)
For solar panels to provide usable electricity to your appliances, you need to convert their current from DC to AC — this is where inverters come in. If you’re using microinverters and haven’t already, hook them up to the back of each solar panel. If you’re using a central inverter, plug your panel strings into the inverter.
For those using microinverters or power optimizers, it’s a good idea to create array maps and enter them into your monitoring software. This way, you can identify panel malfunctions on an individual level.
11. Get Approvals & Connect Your System to the Grid
If you’re building a residential system, once all of your components are installed and wired together, it’s time to connect your system to the grid. Unfortunately, this process can take some time.
A municipal government representative has to visit your property and approve your system, issuing a permission to operate (PTO). You then need a representative from your local utility to connect your system to the grid.
If you’re unsure how to move forward with these steps, consider recruiting help from a contractor.
Solar Panel Installation FAQ
Installing a solar panel system yourself isn’t easy. Let’s address some common questions about the process.
How Do You Install Solar Panels on a Roof?
Before you start rooftop solar installation, you should have an engineer or a roof specialist visit your property and confirm that your roof can support a solar panel system. If it can, you can move on to installation.
You need roof mounts to install rooftop solar panels. After locating your rafters, securely bolt your mounts to them. To make the process of installing both the mounts and the solar panels that attach to them easier, consider renting a lift.
How Long Does It Take to Install Solar Panels?
The timeline for solar panel installation can range anywhere between a few weeks and a few months. Ultimately, it depends on the type of system you’re installing, whether you’re installing everything yourself, and how long it takes to secure permits and approvals.
What Do You Need to Know Before Installing Solar Panels
Before moving forward with solar panel installation, you should know:
- Whether your property can support solar panels
- How big your system needs to be
- Which brand and model of solar panels (and other equipment) you want
- What installation method you’d like to pursue
- How much your system will cost
- What solar incentives you can claim
Did you know that you can handle a chunk of your solar system installation while still getting help from a professional for the most technical bits?
Solartap makes installation easier than ever by connecting you with reliable contractors to support your DIY installation. Get a quote today.


